Side Dishes
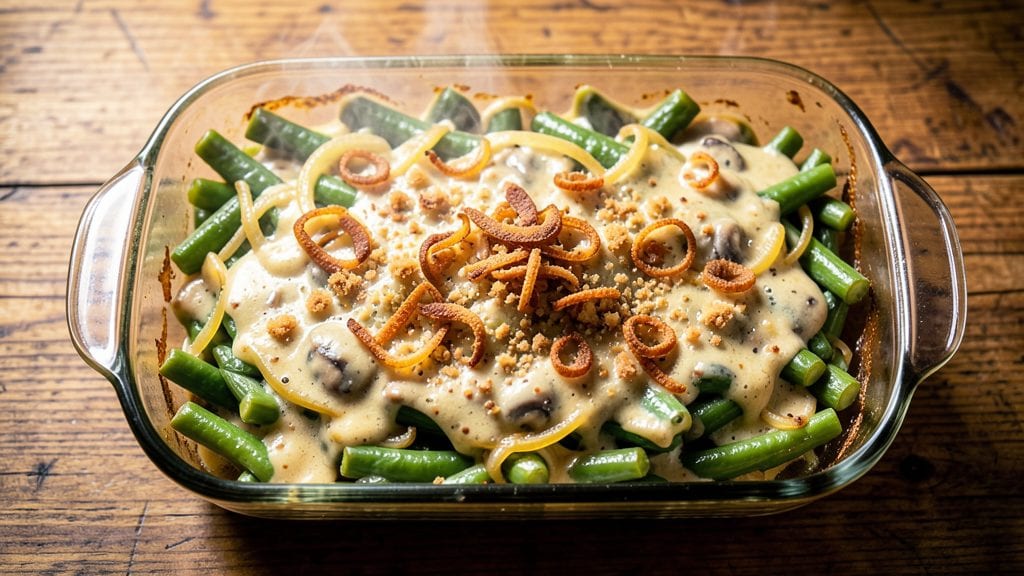
Grandma's green bean casserole recipe brings back the comforting flavors of family gatherings with its signature crispy onion crown over velvety mushroom-infused green beans.
This classic side dish has been passed down through generations, and the secret lies in the perfect balance of textures—tender beans, creamy mushroom sauce, and that unmistakable crunch from the fried onions. I've perfected this recipe over years of holiday cooking, ensuring every bite delivers that nostalgic taste of home.
The foundation of this dish starts with fresh or frozen green beans, simmered just until tender-crisp, then mixed with a rich cream of mushroom soup base. The onions are fried until golden and crispy, then sprinkled generously over the top before baking.
This method guarantees that creamy sauce stays luscious while the onions maintain their satisfying crunch. The result is a dish that's both comforting and impressive, perfect for holiday tables or family dinners.
What makes this recipe truly special is how the layers work together—creamy mushroom sauce soaks into the beans while the onions bake into a golden, crispy crown. The aroma alone will have everyone gathering around the table, and the first bite delivers that perfect combination of textures and flavors.
This is the kind of side dish that turns an ordinary meal into something extraordinary.
Whether you're serving it at Thanksgiving, Christmas, or just a cozy weeknight dinner, this green bean casserole brings warmth and tradition to your table. The recipe is simple to prepare but packed with flavor, making it a crowd-pleaser every time. Let's get started on creating this timeless classic!
Ingredients for grandma's green bean casserole
These nostalgic ingredients transform into Grandma's legendary green bean casserole—crispy, creamy, and full of holiday magic.
| Ingredient | Amount | Notes |
|---|---|---|
| Fresh Green Beans 🥦 | 1 ½ lb | Trimmed, ends cut off |
| Yellow Onions 🧅 | 2 whole | Medium size, sliced thin |
| Cream of Mushroom Soup 🍄 | 2 cups | Canned or homemade, full-fat |
| Heavy Cream 🥛 | ½ cup | Full-fat for creaminess |
| Unsalted Butter 🧈 | ½ cup | Cold, cubed for frying |
| All-Purpose Flour 🌾 | ¼ cup | For dredging onions |
| Salt 🧂 | 1 ½ tsp | Kosher or sea salt |
| Black Pepper 🌶️ | ½ tsp | Freshly ground preferred |
| Garlic Powder 🧄 | ½ tsp | For extra depth |
| Milk 🥛 | ¼ cup | Whole milk for creaminess |
| Parmesan Cheese 🧀 | ¼ cup | Freshly grated, optional |
The onions are the star here—yellow onions give the best crunch, but red or white work too. Costco or Trader Joe's always have the freshest, but grocery store onions are fine if they're firm and dry. Thin slices fry up crispier, so take your time here. For the green beans, fresh works best but frozen is a lifesaver when you're prepping ahead. Just don't thaw them first—toss them straight from frozen into the boiling water. The cream of mushroom soup? Campbell's or French's are the OG brands for a reason, but homemade is where it's at if you've got the time.
No heavy cream? Half-and-half or whole milk with a splash of butter keeps it creamy. Running out of Parmesan? Pecorino or sharp cheddar adds a different but delicious kick. The onions get fried twice—once to soften, then again after dredging for that perfect crunch. Don't skip the second fry—that's what makes the crown crispy. And if you're feeling fancy, add a pinch of nutmeg to the sauce for that classic holiday touch. The flour for dredging? All-purpose works, but cornstarch makes it extra crispy if you're feeling experimental.
This casserole tastes even better the next day—make it ahead and refrigerate. Reheat covered at 350°F for 20 minutes to keep everything creamy. The onions lose their crunch if you reheat too hot, so go slow. Leftovers keep for 4-5 days in the fridge, and it freezes beautifully for up to 3 months. I always double the recipe for holiday gatherings—two 9x13 dishes disappear fast. Pro tip: Sprinkle extra Parmesan on top right before baking for that restaurant-quality finish.
Why You'll Love This Recipe
- One-Pot Magic: I swear by this—just toss the green beans, sautéed onions, and soup in a baking dish, then top it with the creamy butter mix. No chopping, no fuss, and honestly? It feels like a hug in a casserole dish.
- Creamy Crunch Combo: That crispy fried onion topping with the velvety mushroom soup base? It’s the kind of contrast that makes you go back for seconds. The heavy cream and butter take it from good to oh-my-gosh-why-didn’t-I-make-this-sooner.
- Potluck Hero: Between us, this is my go-to for holiday dinners or church gatherings. It reheats beautifully, feeds a crowd, and even my picky uncle (who claims to hate green beans) clears his plate. (Yes, even on a Tuesday night.)
- Budget-Friendly Leftovers: A single batch stretches for lunches all week—just reheat and serve. The soup and cream stretch far, and fresh green beans are cheaper than you’d think. My secret weapon for stretching groceries without sacrificing flavor.
Step-by-step instructions for Grandma's green bean casserole
Here's how to create that perfect balance of crispy fried onions and creamy mushroom sauce.
Blanch and Prepare the Green Beans
Start by trimming the ends off the 1.5 lb fresh green beans and cutting them into 2-inch pieces. This size ensures even cooking and a perfect bite. Place them in a large pot of boiling salted water and cook for 5 minutes—they should be bright green and just slightly tender, not mushy.
Drain immediately and plunge them into an ice bath to stop the cooking process. This keeps them vibrant and prevents overcooking. Once cooled, drain again and pat completely dry with a clean kitchen towel. The beans should be dry for that crisp-tender texture when baked later. Spread them on a baking sheet and set aside.
Create the Creamy Mushroom Sauce
In a large skillet, melt the 0.5 cup unsalted butter over medium heat. Add the 2 whole yellow onions that have been sliced thin and cook for 8-10 minutes until they're golden brown and crispy. This is your crispy onion crown topping—don't skip this step!
Transfer the fried onions to a paper towel-lined plate to drain excess fat. In the same skillet, sprinkle the 0.25 cup all-purpose flour over the remaining butter and onions, stirring constantly for 1-2 minutes until lightly browned. Slowly whisk in the 0.25 cup milk and 2 cups cream of mushroom soup, then stir in the 0.5 cup heavy cream, 1.5 tsp salt, 0.5 tsp black pepper, and 0.5 tsp garlic powder. Simmer for 5 minutes until the sauce thickens slightly. Remove from heat and stir in the 0.25 cup parmesan cheese until melted and smooth.
Assemble and Bake to Perfection
Preheat your oven to 350°F. In a 9x13-inch baking dish, spread the blanched green beans evenly. Pour the creamy mushroom sauce over the top, spreading it gently to coat all the beans. Sprinkle the crispy fried onions evenly over the sauce—this is where the magic happens!
Bake uncovered for 30-35 minutes until the sauce is bubbly and the top is golden brown. If the onions start to brown too quickly, tent loosely with foil. The casserole is done when the edges are bubbling and the center is just set. Let it rest for 5 minutes before serving—this allows the sauce to thicken slightly and the flavors to meld.
Serve with Confidence
Use a spatula to gently fold the crispy onions back into the sauce before serving. The contrast of the warm, creamy mushroom sauce with the crispy onions and tender green beans is what makes this dish legendary. Serve immediately while everything is hot and bubbly—this casserole tastes best fresh out of the oven!
For extra crispiness, broil for 1-2 minutes at the end, watching closely to avoid burning. Each bite should deliver that perfect combination of textures and flavors that makes this a holiday classic. Enjoy your homemade green bean casserole that's sure to impress!
Pro Tips For Making Grandma'S Green Bean Casserole
- Blanch Beans First: Drop those green beans into boiling water for 3-4 minutes before draining and tossing with butter—this softens them just enough to absorb the sauce without turning mushy. I learned this the hard way after serving a batch where the beans were still crunchy while the sauce was ready to pour.
- Sweat, Don’t Burn: When cooking the onions, keep the heat medium-low and let them sweat out their moisture for 8-10 minutes before adding the soup. After burning three batches, I finally figured out that rushing this step adds bitterness that even the creamy sauce can’t hide.
- Whisk the Cream Cold: Stir the heavy cream into the soup mixture last and keep it chilled until you’re ready to mix—this prevents curdling and gives you a smoother, richer sauce. My grandmother swore by this, and she was right: the texture is noticeably creamier when you don’t heat the cream first.
- Skip the Pre-Bake: Dump the bean mixture into the baking dish hot and top with the fried onions right away—no need to pre-bake. I skip this when I’m lazy, but the dish is noticeably better when you cut down on that extra step and let the heat work together from the start.
Make-ahead tips for grandma's green bean casserole
Prep Ahead Timeline
This casserole is a make-ahead dream—I recommend prepping the sauce and beans 24 hours in advance to let flavors meld. Store the sauce in an airtight container in the fridge, and keep the blanched beans in a separate container.
The onions stay crispy if fried fresh, but you can prep the dredging mix (flour + salt) ahead and store it in a small sealed bag. 📅
Freezer-Friendly Assembly
For holiday prep, assemble the casserole completely (even with the fried onions) and freeze it in a heavy-duty foil-wrapped baking dish. When ready to serve, bake straight from frozen at 375°F for 50-55 minutes, tented with foil for the first 30 minutes.
The extra time ensures even heating without drying out the sauce. I always label my freezer dishes with the date—this keeps for 3 months without texture loss. ❄️
Reheating Perfection
Leftovers reheat best at 350°F for 20-25 minutes, covered with foil to retain moisture. For microwave reheating, cover with a damp paper towel and heat in 1-minute intervals on 50% power until 165°F internal temperature.
The onions lose crispiness when microwaved, so I always save this for non-holiday days when texture isn't critical. 🔥
Double Batch Strategy
For Thanksgiving crowds, double the recipe and bake in two 9x13-inch dishes simultaneously. Use the same oven rack spacing (middle and bottom racks) for even heat distribution.
I like to bake them side-by-side for 25 minutes, then switch their positions. This ensures both casseroles finish at the same time without one drying out. 🍽️
Onion Prep Shortcut
Save time by pre-slicing onions and storing them in a ziplock bag with a paper towel to absorb moisture. When ready to fry, just dump them straight into the hot butter—no extra drying needed.
For extra crispiness, use cornstarch instead of flour for dredging. The onions will be shatteringly crisp and worth the 5-minute extra step. 🧅
Garnish Just Before Serving
The crispy onion crown loses its magic if added too early. Always sprinkle fresh fried onions right before baking (or after reheating). For a restaurant-worthy finish, top with extra Parmesan and broil for 1-2 minutes until golden.
This adds that golden, bubbly crust that makes everyone ask for seconds. ✨
Nutrition facts
Frequently asked questions
Can I use frozen green beans instead of fresh?
Frozen green beans work perfectly and save time. Just skip the blanching step and use them straight from frozen—toss them into the baking dish with the sauce. They'll cook through during the baking process. For best texture, avoid thawing them first.
How do I make the fried onions extra crispy?
For restaurant-style crispiness, use cornstarch instead of flour for dredging. Fry the onions in small batches in hot butter (375°F) until golden brown. Let them cool completely on paper towels before adding to the casserole. Double-frying (once before dredging, once after) guarantees that perfect crunch!
Can I make this casserole ahead of time?
Yes! Assemble it completely (including the fried onions) up to 24 hours ahead and refrigerate uncovered. Bake straight from the fridge at 350°F for 40-45 minutes. For freezing, assemble fully, cover tightly, and bake from frozen at 375°F for 50-55 minutes. The flavors actually improve overnight!
What if my casserole gets watery during baking?
This usually happens if the beans weren't dried properly or the sauce was too thin. Fix it by baking uncovered for 5-10 extra minutes to evaporate moisture. For next time, pat beans completely dry and simmer the sauce longer (up to 8 minutes) to thicken it before assembling. A sprinkle of cornstarch mixed with cold water can also rescue a watery casserole.
Can I make this vegetarian?
Easily! Swap the cream of mushroom soup for a vegetarian mushroom cream sauce (blend sautéed mushrooms, vegetable broth, and nutritional yeast). Use plant-based butter and heavy cream alternatives. For extra richness, add a splash of white wine to the sauce. The texture and flavor will still be delicious!