Desserts
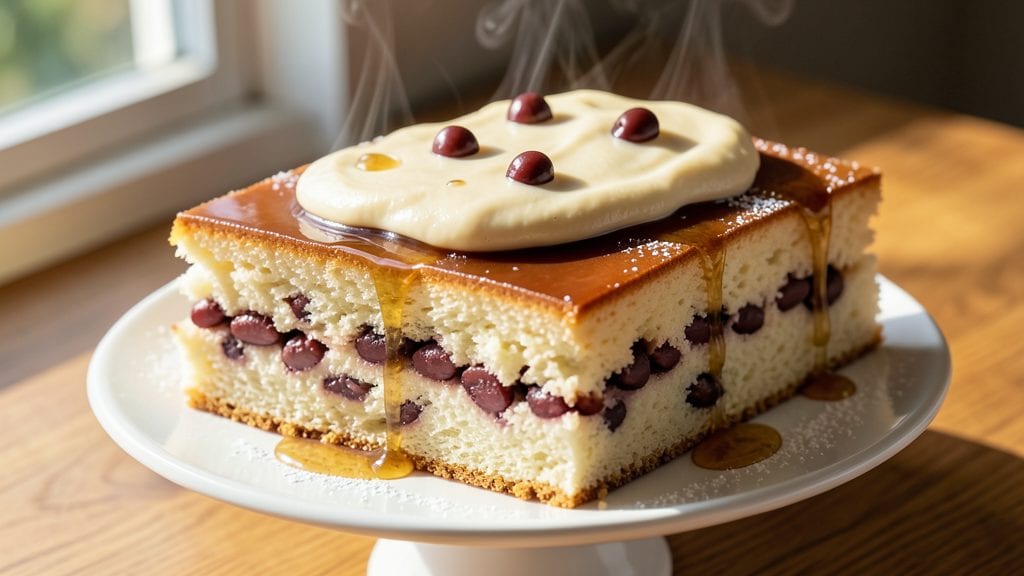
This red bean cake recipe delivers layers of silky adzuki bean filling wrapped in delicate, fluffy cake—perfect for tea time or celebrations. The secret lies in using real beans for authentic texture and flavor, not sweetened paste.
I’ve perfected this version to balance traditional techniques with modern flexibility, whether you’re baking for a crowd or a quiet afternoon treat.
The cake’s magic starts with the bean filling: adzuki beans simmered until tender, then blended with sugar and a touch of oil for a velvety consistency.
The cake batter, made with simple ingredients like flour, sugar, and baking powder, rises to create a light, airy shell that contrasts beautifully with the dense, sweet filling.
Baking at the right temperature ensures even layers without cracking, while a light dusting of powdered sugar adds that final touch of elegance.
What you’ll end up with is a slice that’s both comforting and impressive—soft, slightly chewy cake surrounding pockets of sweet, earthy bean filling. The aroma of freshly baked cake mixed with the natural scent of adzuki beans fills the kitchen, making it impossible to resist.
This recipe is adaptable too: swap in matcha or cocoa powder for a twist, or use gluten-free flour for dietary needs.
Serve warm with a cup of green tea or let it cool for a firmer texture. The cake keeps well for days, making it ideal for meal prep or gifting.
Whether you follow tradition or add your own flair, this red bean cake is sure to become a favorite. Let’s get baking!
Ingredients for red bean cake
Twelve simple ingredients for a showstopping red bean cake—real adzuki beans make all the difference.
| Ingredient | Amount | Notes |
|---|---|---|
| Adzuki Beans 🌾 | 1 ½ cups | Dried, soaked overnight |
| Granulated Sugar 🍚 | 1 ½ cups | White or brown preferred |
| Vegetable Oil 🫒 | ½ cup | Light or neutral flavor |
| All-Purpose Flour 🌾 | 3 cups | Gluten-free blend optional |
| Baking Powder 🍞 | 2 tsp | Double-acting preferred |
| Salt 🧂 | ½ tsp | Fine sea salt |
| Non-Dairy Milk 🥛 | ½ cup | Almond or soy milk |
| Vanilla Extract 🌸 | 1 tsp | Pure vanilla preferred |
| Powdered Sugar 🍚 | ½ cup | For dusting |
| Cornstarch 🌾 | 2 tbsp | For bean smoothness |
| Matcha Powder 🍵 | 1 tbsp | Optional for green twist |
| Cocoa Powder 🍫 | 1 tbsp | Optional for chocolate version |
Adzuki beans are the star here. Look for dried beans at Asian markets—they’re cheaper and more flavorful than canned. Soak them overnight to cut down on cooking time. I usually grab mine from H Mart or Trader Joe's if I'm in a pinch. For the flour, King Arthur or Bob's Red Mill are my go-tos—they bake evenly. The matcha and cocoa are optional but add fun twists if you’re feeling experimental.
No adzuki beans? Sweet red lentils work in a pinch—they’re milder but still sweet. Swap the vegetable oil for melted coconut oil if you’re avoiding refined oils. For a lighter cake, almond flour replaces half the all-purpose flour (but expect a denser texture). The vanilla extract can be omitted if you’re using matcha or cocoa, but I always keep it—they balance the earthiness of the beans. If you’re gluten-free, Bob’s Red Mill 1:1 blend works perfectly.
This cake keeps beautifully—wrap tightly in plastic for up to 5 days at room temperature or 2 weeks in the fridge. For longer storage, freeze slices wrapped in parchment for 3 months. The filling thickens as it cools, so I like to reheat slices for 10 seconds to bring back that soft, gooey texture. Dust with powdered sugar right before serving—it’s that final touch that makes it feel special.
Why You'll Love This Recipe
- No Fuss Mixing: I swear, this is one of those recipes where you just dump everything in. The adzuki beans are pre-cooked (or canned for even less work), and the batter comes together in minutes—no fancy techniques, no waiting for dough to rise. Honestly, the hardest part is deciding whether to make it in a loaf pan or cupcake molds.
- Sweet-Savory Magic: That deep, caramelized sugar glaze? It’s the star. The adzuki beans add a natural nuttiness that balances the sweetness, and the baking powder gives it just enough lift to feel light—not dense like some baked bean treats. (Yes, even on a Tuesday night, this tastes like a treat.)
- Lunchbox Legend: Between us, this is my go-to for school lunches or office snacks. Slice it into bars, and it’s hearty enough to keep kids (or adults) full for hours. I’ll often add a sprinkle of sesame seeds for crunch, and suddenly it’s a showstopper—no one guesses how simple it is.
- Pantry Staple Power: I keep a bag of adzuki beans and sugar on hand just for this. It’s cheap, it lasts, and the leftovers? They stay fresh for days—perfect for when I forget to plan ahead. (Which, let’s be real, happens more often than I’d like to admit.)
Step-by-step instructions for red bean cake with real adzuki beans
Here's how to create layers of silky adzuki bean filling and tender cake that balance perfectly.
Prepare the Adzuki Bean Filling
Drain and rinse the soaked adzuki beans thoroughly. In a medium saucepan, combine the beans with the 1.5 cups granulated sugar, 0.5 cup vegetable oil, and 0.5 cup non-dairy milk. Bring to a gentle boil over medium heat, then reduce to low and simmer uncovered for 45-50 minutes, stirring occasionally.
You'll know it's ready when the beans are completely tender and the mixture thickens to a spreadable consistency. The filling should coat the back of a spoon smoothly. If using matcha powder or cocoa powder, whisk it into the filling during the last 5 minutes of cooking for that signature flavor twist.
For extra smoothness, transfer the cooked filling to a blender or food processor and blend until completely smooth. If it's too thick, add 1-2 tablespoons of non-dairy milk to reach your desired consistency. Let it cool completely before using.
Mix the Cake Batter
In a large mixing bowl, whisk together the 3 cups all-purpose flour, 2 teaspoons baking powder, and 0.5 teaspoon salt. In a separate bowl, combine the remaining 0.5 cup vegetable oil, 0.5 cup non-dairy milk, and 1 teaspoon vanilla extract.
Gradually add the wet ingredients to the dry ingredients, mixing just until combined. Be careful not to overmix—stop as soon as the batter comes together. The mixture should be slightly thick but pourable. If the batter seems too stiff, add 1 tablespoon of non-dairy milk to loosen it.
For a classic red bean cake, you can stop here. If you're making the matcha or chocolate version, whisk in 1 tablespoon of matcha powder or cocoa powder with the dry ingredients at the beginning. The batter will be slightly darker, but the flavor will be worth it.
Assemble the Cake Layers
Preheat your oven to 350°F. Grease and flour two 9-inch round cake pans or line them with parchment paper. Divide the cake batter evenly between the pans, spreading it out to create even layers.
Spread half of the cooled adzuki bean filling evenly over the first layer of batter in each pan. Then, pour the remaining batter over the filling, creating a second layer. Repeat with the second pan if making two cakes. Smooth the tops with a spatula for even baking.
For a decorative touch, sprinkle a thin layer of powdered sugar over each cake before baking. This creates a beautiful lattice pattern as the cakes rise. Bake for 30-35 minutes, or until a toothpick inserted into the center comes out clean.
Cool and Finish
Allow the cakes to cool in the pans for 10 minutes, then transfer them to a wire rack to cool completely. Once cooled, dust the tops generously with the remaining 0.5 cup powdered sugar. This step is essential—it gives the cake that classic, elegant finish.
For extra flair, you can brush the sides of the cakes with a simple syrup made by dissolving 2 tablespoons granulated sugar in 2 tablespoons hot water. This adds moisture and makes the cake even more tender. Serve the cake at room temperature for the best texture.
This cake keeps well for up to 3 days at room temperature, covered with a damp cloth. The flavors actually improve as the cake sits, allowing the adzuki bean filling to meld perfectly with the cake layers. Enjoy your homemade red bean cake with a cup of tea or coffee!
Pro Tips For Making Red Bean Cake
- Soak Beans Overnight: I learned this the hard way—rushing the soak leaves your adzuki beans tough and mealy. Cover them in water (about 3 cups per cup of beans) and let them sit at least 12 hours, or until they’re twice their original size. No, you can’t microwave them into submission—this is non-negotiable for that silky texture.
- Grease the Pan Well: Red bean cake sticks like glue if you’re lazy with oil. Use about 2 tablespoons of vegetable oil, rub it all over the pan and the sides, then sprinkle a thin layer of flour inside. Flip the cake out cleanly, or you’ll be scraping burnt bits off your fingers later.
- Fold, Don’t Stir: Once you mix the cooked beans with the batter, resist the urge to stir like you’re making pancakes. Use a spatula to fold in the flour mixture—just enough to combine—so the texture stays tender, not dense. Overmixing is how you end up with a brick.
- Check Doneness Early: The cake looks done when it springs back and when a toothpick comes out clean—but with red bean cake, pull it at 160°F (71°C). It’ll finish cooking while cooling, and you’ll avoid a gummy center. Trust the thermometer, not just your eyes.
Perfect pairings for these flavors
Tea Time Classics
This red bean cake pairs beautifully with traditional Japanese sencha or Chinese jasmine tea—their delicate floral notes complement the earthy sweetness of the adzuki filling. I prefer high-quality loose-leaf tea from brands like Harney & Sons or Twinings for that authentic experience.
The warmth of the tea enhances the cake's natural flavors without overpowering them. 🍵
Fruit Toppings
Add a fresh mango or strawberry compote to elevate your serving. Simmer 1 cup diced mango with 1 tbsp honey and 1 tsp lemon juice until thickened, then drizzle over slices.
The tropical sweetness contrasts perfectly with the cake's rich filling. For a lighter option, top with lychee jelly or kiwi slices for a vibrant pop of color.
Warm Spiced Milk
Heat 1 cup non-dairy milk with ½ tsp cinnamon, ¼ tsp cardamom, and 1 tsp honey> until steaming. The warm spices enhance the cake's natural sweetness, creating a comforting dessert experience. I love using almond milk for its nutty undertones that pair well with the adzuki beans.
Iced Matcha Latte
For a refreshing twist, serve slices with an iced matcha latte. Whisk 1 tbsp matcha powder with 2 tbsp hot water, then mix with 1 cup cold almond milk> and ice.
The vibrant green color and earthy matcha flavor mirror the cake's filling, creating a cohesive dessert experience. Add a dash of vanilla syrup for extra sweetness if needed.
Garnish Ideas
Before serving, dust with toasted coconut flakes or crushed pistachios for texture. A sprinkle of edible gold leaf adds an elegant touch for special occasions. For a playful presentation, arrange slices on a tiered stand with fresh mint leaves and raspberries scattered around.
The visual contrast makes the cake even more inviting. ✨
Seasonal Variations
In summer, serve with chilled lychee juice or coconut sorbet to balance the cake's richness. During winter, pair with spiced chai tea or mulled apple cider** for warmth.
The contrast between hot and cold beverages enhances the cake's versatility year-round. I find that seasonal pairings make the dessert feel even more special. 🌟
Nutrition facts
Frequently asked questions
Can I make this red bean cake without eggs?
This recipe is naturally egg-free, using non-dairy milk and oil for moisture. The baking powder creates lift, while the bean filling adds natural richness. For extra fluffiness, add 1 tablespoon of applesauce or mashed banana to the batter. The texture stays light and tender without eggs.
Why does my bean filling turn grainy?
Overcooking or insufficient blending causes graininess. Simmer beans for exactly 45-50 minutes until tender, then blend until completely smooth. If too thick, add 1-2 tablespoons non-dairy milk while blending. For extra silkiness, strain through a fine-mesh sieve before blending.
Can I substitute canned red beans?
Canned beans work in a pinch, but dried adzuki beans are ideal for authentic texture. If using canned, drain and rinse thoroughly, then simmer with 1/4 cup extra sugar and 1/2 cup water to reach the right consistency. The flavor will be slightly less complex, but the cake will still be delicious.
How do I prevent the cake from cracking?
Cracking happens when the oven gets too hot or the cake cools unevenly. Preheat your oven for 15 minutes and use an oven thermometer to confirm 350°F. Avoid opening the oven door early, and let the cake cool in the pan for 10 minutes before transferring. A light dusting of powdered sugar before baking also helps create a protective layer.
What's the best way to store leftovers?
Wrap slices tightly in plastic wrap and store at room temperature for 2-3 days or refrigerate for 5 days. For longer storage, freeze individual slices wrapped in parchment for up to 3 months. Reheat in the microwave for 10-15 seconds to restore softness. The flavors actually improve with time!